How to Prepare Walls Before Painting: The Professional Decorator’s Guide
Did you know that a professional decorator spends roughly 70% of their time on a project before a single drop of colour even touches the wall? It’s a striking figure, but it highlights the reality that a premium finish is won or lost in the preparation phase. Understanding how to prepare walls before painting is the secret to achieving a high-end, durable result. We understand the temptation to rush straight to the transformation, especially when you’re worried about the mess of sanding dust or feel confused by the rows of different fillers in the local DIY shop.
If you’ve ever feared your new paint might peel or crack within months, you aren’t alone. Mastering these professional techniques is the only way to guarantee the precision your home deserves. In this guide, we’ll share the methodical steps used by experts to create a smooth, physically receptive surface. We’ll walk you through the exact sequence of deep cleaning, targeted repairs, and the benefits of modern dust-free sanding technology to ensure your next project results in a flawless, long-lasting finish with minimal disruption to your home.
Key Takeaways
- Learn why professional decorators follow the 90/10 rule, dedicating the vast majority of project time to surface prep before any paint is applied.
- Discover how to prepare walls before painting by conducting a tactile audit to identify and repair deep-seated imperfections that compromise longevity.
- Understand the methodical sanding process, moving through specific grit sizes to create a perfectly level “key” for maximum paint adhesion.
- Master the degreasing and priming techniques that prevent paint failure caused by invisible residues like fingerprints or household grease.
- Use the “oblique light” test and tack cloths during your final inspection to ensure a completely debris-free surface for a flawless finish.
Table of Contents
- The Foundation of a Flawless Finish: Why Preparation Matters
- Identifying and Repairing Surface Imperfections
- The Sanding Stage: Achieving a Perfectly Level Surface
- Degreasing and Priming: Ensuring Maximum Paint Adhesion
- Final Inspections and Setting Up for the First Coat
- Frequently Asked Questions
The Foundation of a Flawless Finish: Why Preparation Matters
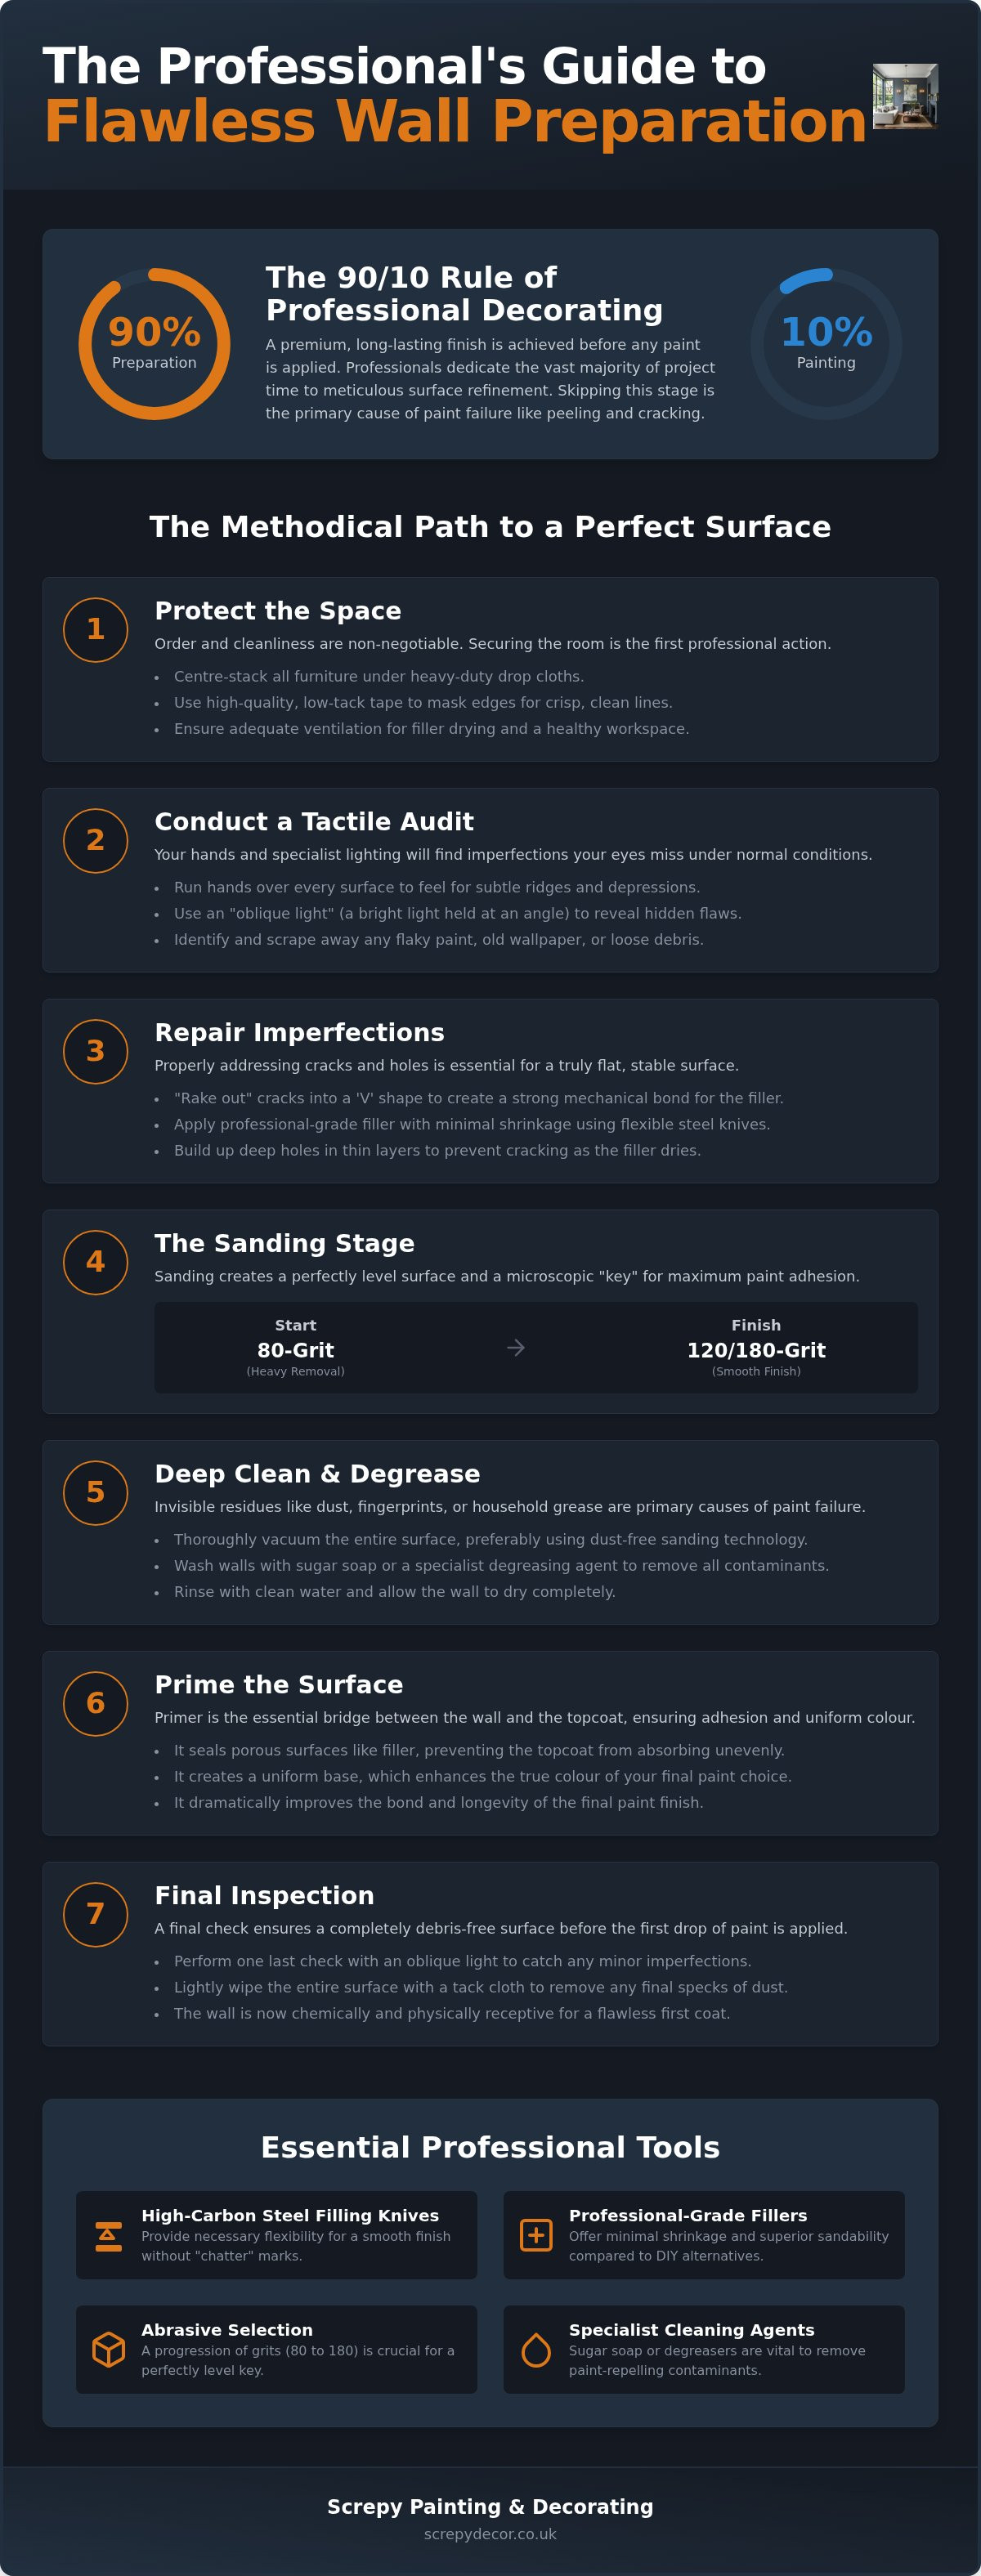
Professional decorating is often misunderstood as the simple act of applying colour. In reality, the most critical phase happens long before the tin is opened. At Screpy Decorators, we adhere to the 90/10 rule: 90% of our time is dedicated to meticulous surface refinement, leaving just 10% for the final application. This methodical approach is what determines the longevity of the finish. If the foundation isn’t stable, even the most expensive paint will eventually fail. You aren’t just cleaning a surface; you’re engineering a bond.
Learning how to prepare walls before painting involves a shift in perspective. Skipping steps like degreasing or proper sanding might save a few hours today, but it leads to the dread of peeling or cracking later. Rectifying these issues often requires stripping the wall back to the plaster, which is far more costly than doing the job correctly the first time. Our philosophy centres on precision and protection, ensuring every wall is chemically and physically ready to receive its new coating.
Essential Tools for Professional Wall Preparation
You can’t achieve a high-end finish with budget equipment. Professional decorators rely on a specific kit to ensure accuracy and a smooth workflow:
- High-carbon steel filling knives: These provide the flexibility needed for smooth application without the “chatter” marks left by plastic alternatives.
- Professional-grade fillers: These products offer minimal shrinkage and superior sandability compared to generic DIY tubs.
- Abrasive selection: We use a progression of grits, typically starting at 80-grit for heavy removal and finishing at 120 or 180-grit for a perfectly level surface.
- Specialist cleaning agents: Sugar soap or dedicated degreasers are vital for removing airborne contaminants and oils.
Correct lighting is also a fundamental tool. We use high-output site lights positioned at an angle. This “oblique lighting” reveals shadows, bumps, and hollows that are completely invisible under standard room bulbs, allowing us to fix imperfections before they’re highlighted by fresh paint.
Protecting Your Space and Furniture
Order and cleanliness are the hallmarks of a professional service. Before the refinement process begins, the room must be secured. We recommend centre-stacking furniture and covering it with heavy-duty, laminated drop cloths. This keeps your belongings safe and provides a clear perimeter for the decorator to move freely. It’s about respecting the home as much as the craft.
Masking is an art form itself. We use high-quality, low-tack tapes for delicate surfaces to ensure crisp lines without the risk of pulling off existing finishes. Whilst we focus on creating a dust-controlled environment, especially through our specialist dust-free sanding technology, maintaining adequate ventilation is still vital. It helps fillers dry consistently and ensures a healthier workspace for everyone in the property.
Identifying and Repairing Surface Imperfections
Understanding how to prepare walls before painting requires a diagnostic eye. Before you pick up a brush, you must conduct a thorough tactile and visual audit of every square inch of the substrate. Run your hands over the surface to feel for subtle ridges or depressions that your eyes might miss under standard lighting. It’s during this phase that you identify the difference between a simple cosmetic blemish and a deeper structural concern. If you’re unsure about the integrity of your surfaces, our interior painting experts can provide a professional assessment to ensure your walls are fit for decoration across St Albans, Welwyn Garden City, and Hertfordshire.
Once the audit is complete, the next step is the physical removal of anything that isn’t a stable part of the wall. This includes scraping away flaky paint, stripping old wallpaper remnants, and clearing loose debris from previous DIY attempts. A common mistake is painting over old adhesive or loose edges; this almost always leads to the new coat bubbling or lifting. You need a clean, “virgin” surface to ensure the paint bonds correctly to the wall rather than sitting on a layer of dust.
For cracks, simple surface filling isn’t enough. You must “rake out” the crack using the point of a filling knife to create a slight “V” shape. This might feel counterintuitive as it makes the hole look larger, but it’s essential for creating a mechanical bond. It allows the filler to sit deep within the wall rather than just bridging the gap on the surface. When applying the filler, work in thin layers. Thick applications are prone to shrinkage and internal cracking as they dry, whereas multiple thin passes create a dense, stable repair that sits flush with the surrounding plaster.
Dealing with Cracks, Holes, and Blown Plaster
Most hairline cracks are merely settlement issues, but wider gaps or recurring cracks may suggest movement. A vital diagnostic tool is the “tap test.” Gently knock on the wall with your knuckles; a hollow, drum-like sound indicates blown plaster where the material has detached from the brickwork or lath behind it. This requires more than just filler. It often needs a professional solution to stabilise the area before any aesthetic work can begin. For deep holes, use a two-part chemical filler for the base layer to prevent sagging, followed by a fine-surface finishing filler.
Managing Damp, Mould, and Water Stains
Never paint over active mould or damp patches. It’s a temporary fix that masks a growing problem and will quickly destroy your new finish. You must identify and stop the source of the moisture first. Once dry, treat the area with a specialist fungicidal wash to sterilise the surface and kill any remaining spores. Water stains from old leaks are equally persistent; they contain tannins that bleed through standard emulsions. Read our dedicated guide on how to treat and paint over mould in UK homes for step-by-step instructions.
The Sanding Stage: Achieving a Perfectly Level Surface
Sanding is the physical refinement phase where repairs are integrated into the existing wall. Whilst many homeowners view this as a way to simply smooth out bumps, a professional decorator understands it as a process of creating a “key.” This microscopic texture allows the paint to physically grip the substrate. Without this mechanical bond, the paint sits loosely on the surface, making it prone to peeling. When you are learning how to prepare walls before painting, you must treat sanding as a precision task rather than a chore of brute force.
Consistency is vital. You should sand after every stage of the repair process, particularly after each layer of filler has fully cured. This ensures that the repair remains flush and doesn’t create a “ghosting” effect once the paint is applied. Difficult surfaces, such as old woodwork or walls previously finished in high-gloss paint, require even more attention. These surfaces are naturally repellent to new water-based emulsions; they must be thoroughly abraded until the sheen is completely removed, leaving a dull, receptive finish.
Traditional Sanding vs. Modern Dust-Free Sanding
Traditional hand-sanding is notoriously messy and potentially hazardous. Inhaling fine particles of plaster, old lead-based paint, or wood dust can lead to significant respiratory irritation. This fine dust also settles into carpets and soft furnishings, often remaining in the home for weeks after the project concludes. It’s a common pain point that often causes homeowners to dread the decorating process.
At Screpy Decorators, we use advanced dust-free sanding technology to eliminate these risks. These systems extract 99.9% of dust at the point of creation, protecting your lungs and keeping your property pristine. Beyond the health benefits, a dust-free environment results in a superior finish. Because there is no airborne debris to settle back onto the wet paint, the final application remains perfectly smooth and free from unsightly grit or “nibs.” Read our guide to dust-free sanding benefits.
Selecting the Correct Grit for Every Surface
Choosing the right abrasive is a calculated decision based on the condition of the wall. Grit refers to the number of abrasive particles per square inch of the paper; a lower number indicates a coarser texture, while a higher number signifies a finer finish.
- 80-grit: Use this for heavy removal, such as levelling out significant ridges in old paint or shaping coarse filler.
- 120-grit: This is the workhorse of general wall preparation, ideal for smoothing standard repairs and creating a uniform key.
- 180-grit and above: These finer abrasives are used for the final “buff.” They polish the surface to a silk-smooth touch, ensuring the most delicate finishes look flawless.
Always sand in a circular or “figure-of-eight” motion to avoid creating directional grooves. By moving methodically through these grit sizes, you transform a patched and uneven surface into a perfectly level canvas ready for the next phase of the professional process.
Degreasing and Priming: Ensuring Maximum Paint Adhesion
Once the physical sanding is complete, the focus shifts to the chemical readiness of the surface. Even a perfectly level wall can suffer from paint failure if invisible contaminants are present. Fingerprints, household oils, and airborne grease act as release agents, preventing the paint from forming a permanent bond with the substrate. This is why understanding how to prepare walls before painting requires as much attention to chemistry as it does to abrasives. Without a chemically clean surface, you risk flaking or patches where the paint refuses to stick.
It’s also vital to distinguish between primers and undercoats. A primer is engineered specifically for adhesion; it’s the “glue” that anchors itself into the wall. An undercoat, by contrast, provides the opacity and flat base required for the final colour to sit correctly. Using the wrong product at this stage is a common DIY pitfall. If you want to ensure your surfaces are prepared to this exacting standard, contact our interior painting contractors for a professional finish.
The Role of Sugar Soap and Chemical Cleaning
Sugar soap is the industry standard for degreasing, but it must be used with precision. We recommend mixing it in warm water and applying it with a sponge, working from the bottom of the wall upwards to prevent “run streaks” from staining the plaster. Pay particular attention to high-traffic grease zones. These are typically found in kitchens near hobs, in hallways where hands frequently touch the walls, and around light switches.
The most critical part of this process is the final rinse. You must wipe the walls down with clean, fresh water to remove every trace of the sugar soap residue. If left on the wall, the chemical film can react with the new emulsion, causing the paint to crack or “soap” as it dries. It’s a simple step, yet it’s often the difference between a professional result and a failed project.
When to Use Specialist Primers and Mist Coats
Newly plastered walls or large areas of fresh filler are incredibly porous. If you apply standard emulsion directly, the “suction” of the dry plaster will pull the moisture out of the paint too quickly, preventing it from curing. This leads to a brittle finish that will eventually peel off in sheets. The solution is a mist coat: a diluted layer of trade emulsion (typically 70% paint to 30% clean water) that satisfies the plaster’s thirst and provides a stable base for subsequent coats.
Specialist primers are also necessary for problematic substrates. If you’re dealing with old nicotine stains, water damage, or wood tannins, a standard water-based primer won’t be enough. These contaminants are water-soluble and will bleed through your new paint regardless of how many coats you apply. In these instances, we use high-performance, shellac-based (like Zinsser B-I-N) or solvent-based stain blockers to permanently seal the surface before decoration begins.
Final Inspections and Setting Up for the First Coat
The final inspection is the bridge between preparation and transformation. It’s the moment where you verify that the hours of labour spent on repairs and sanding have achieved the desired standard. Mastering how to prepare walls before painting culminates in this “critical eye” phase. Before you reach for the roller, you must ensure the environment is pristine. Even a few stray particles of debris can ruin a finish, creating unsightly “nibs.”
We use the “oblique light” test as our final quality gate. By holding a high-powered site light parallel to the wall surface, long shadows highlight every microscopic imperfection. Bumps that are invisible under standard ceiling lights suddenly become obvious. Once these final snags are addressed, we perform a total dust extraction. Whilst our dust-free sanding systems capture 99.9% of particles, we still use tack cloths for a final wipe to pick up microscopic dust.
The “Critical Eye” Check and Snagging
A professional snagging list is your best tool for consistency. Walk the room methodically and mark any remaining defects with a piece of low-tack tape. It’s a common occurrence for the first coat of paint to reveal a scratch or a hollow you previously missed. Don’t ignore it. It’s far better to stop, re-fill, and sand that small area now than to live with a visible flaw for years.
Professional Next Steps: When to Call in the Experts
While many homeowners enjoy the challenge of a single room, the scale and complexity of a full property renovation often require a different level of precision. Achieving a truly flawless finish across multiple rooms or high-ceilinged hallways is physically demanding and technically exacting. Professional painting contractors bring the discipline, equipment, and speed necessary to deliver a premium result without the stress of a prolonged DIY project.
If you’re managing a high-end residential project or a commercial space, the value of a structured, methodical approach cannot be overstated. We pride ourselves on a reputation built on consistency and transparency across St Albans and Hertfordshire.
- 💬 Get an instant price estimate: Try our Interactive Quote Calculator
- 📧 Book a free site consultation: Contact Screpy Decorators Today
Frequently Asked Questions
Do I really need to sand my walls if they look smooth?
Yes, even smooth-looking walls require sanding to create a “key” for paint adhesion. Without this microscopic texture, the paint sits on the surface rather than bonding to it. Sanding also removes invisible nibs or old paint drips that only become visible once the new coat dries.
Can I paint over old wallpaper if it is stuck down well?
We strongly advise against painting over wallpaper, even if it appears secure. The moisture in water-based emulsions can soften the old adhesive, causing the paper to bubble or lift away from the wall. For a professional result, always strip the paper back to the original plaster and clean off any remaining paste residue. Read our guide on kitchen spraying vs vinyl wrapping.
What is the best way to clean walls before painting without sugar soap?
A solution of warm water mixed with a small amount of mild dish soap is an effective alternative to sugar soap for general cleaning. You must ensure a thorough rinse with clean fresh water afterwards to remove any soapy film that could interfere with paint adhesion.
How long should I leave filler to dry before I start sanding?
Most standard wall fillers require at least 1 to 2 hours for shallow repairs, but deep holes may need up to 24 hours depending on room temperature and humidity. Filler is ready when it feels completely hard and turns a lighter, uniform white shade.
What happens if I don’t put a mist coat on new plaster?
Skipping a mist coat on new plaster often results in the paint peeling off in large sheets. Bare plaster is extremely thirsty and will suck moisture out of standard paint before it cures properly. A diluted mist coat (70% paint, 30% water) satisfies this suction and anchors the paint to the wall.
How do I prepare a wall that has previously had mould issues?
First resolve the underlying damp issue, then clean the surface with a specialist fungicidal wash to kill spores. Once dry, apply a shellac or oil-based stain-blocking primer to prevent residual marks from bleeding through. Read our full guide on how to treat and paint over mould in UK homes.
Is dust-free sanding worth the extra effort for a single room?
Dust-free sanding is actually less effort because it eliminates hours of deep cleaning afterwards. By capturing 99.9% of dust at the sanding pad, fine plaster particles cannot float into other rooms or contaminate wet paint.
Can I use a hairdryer to speed up the drying time of wall filler?
No, using a hairdryer causes filler to dry too quickly on the surface while remaining wet underneath, leading to internal tension and cracking. Allow filler to dry naturally or use a specialist quick-drying product.
About the Author: Screpy Decorators
Screpy Decorators publishes practical guidance on preparation, paint systems, wallpaper calculations, and planning decorating work in Hertfordshire.
Planning a Decorating Project?
Get a precise, itemized written quotation for your home or business premises in Welwyn Garden City, Hatfield, or St Albans.